(Initially published April 2017, on my original blog)
Ever since starting at Makespace in Cambridge I’ve loved the fact that the tools available today mean that you can design and build almost anything you want. Makespace has some great equipment but for me it’s a trip in and too far away when the job that you want to do can take hours to complete. The process of production with a 3D printer is not an exact science and requires multiple iterations, traveling somewhere to then wait for hours is painful, so it was time to get myself a printer. It didn’t need to be anything special as when I need a fine finish I could always use the printers at Makespace, I had some Amazon vouchers that I was itching to use and there seemed to be some bargains available but would they be up to the job?
Time to do some research.
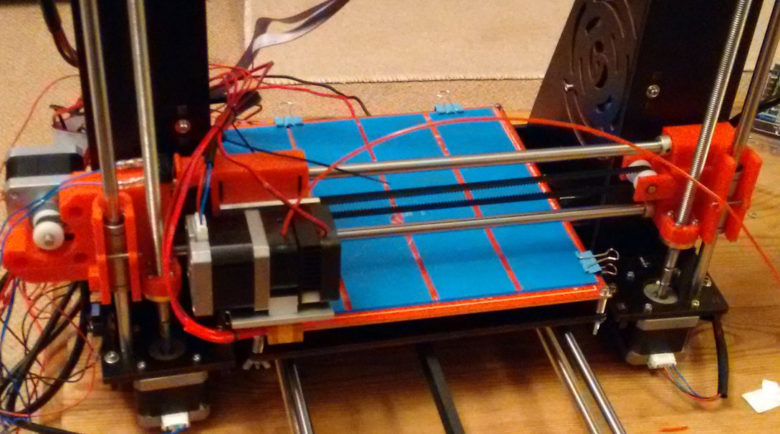
I read reviews, watched Youtube videos and talked to makers about the printers I was looking to buy. I liked the look of the Prusa i3 for price, functionality and the fact that lots and lots had been built at home by makers, in exactly the same way I was planning. However eventually it came down to price, and when I found what I wanted for £150 on Amazon that was it. I decided that if I spent that even if had to replace a lot of the parts I would learn a lot and get value for money – decision made.
I wanted to be sure I had it in time for the Christmas holidays, so ordered in plenty of time, and a week later my parcel arrived.
Now plans are great but I don’t have the most patience and within a couple of days I decided I couldn’t wait for Christmas. I justified this to myself with the reasoning that if I did start construction over Christmas and there were pieces missing I’d never be able to get the parts delivered – So I started the build.
The Chinese/English instructions were amusing/confusing and in a couple of cases incorrect but I already knew this would be the case from the articles I’d read. I also knew from the videos I’d watched roughly how to put it together and these two pretty much covered it:
- Mechanical build – https://www.youtube.com/watch?v=5fGOw49j3FQ
- Electrical build – https://www.youtube.com/watch?v=KXIIutau8gQ
The build itself was straightforward and I could work out any confusing pieces from pictures on the website or from other builds. The only problem I had was when it came to connecting electrical elements to the controller board. Here the instructions were just plan wrong, the picture of the board was incorrectly labeled and the written instructions referred to connecting two different components to the same sockets on the board.
Fortunately these days many people have done this and a lot of information is available on the web. The board I had said GT2560 and although this was clearly a copy it was fortunately fairly accurate. The board details on the Geeetech site http://www.geeetech.com/wiki/index.php/GT2560 told me which connections were which and I could then complete construction.

Once the build was done that was it! No, really, I fed in the cheap red PLA filament that I got with it, triggered the heating of the bed and hotend for PLA and then leveled the bed. I created a simple rectangle shape in Fusion360 and imported it into Cura. Took the SD card from the printer and saved the gcode to it from Cura. Then selected ‘Print from SD card’, chose my rectangle and away it went. The result was surprisingly good, accurate as far as my measurement with a ruler was concerned.
Brilliant, for £150 I now had the ability to design and fabricate pretty much anything I needed in plastic.